
Have you ever walked into a garden and felt like you were in a magical green forest? Imagine having that feeling right on your balcony or in your backyard!
A cedar vertical garden can transform even the smallest space into a lush, green paradise. But how do you get started, and why should you choose cedar for your vertical garden? Let's dive in and find out!
What is a Cedar Vertical Garden?
A cedar vertical garden is simply a garden that grows upward instead of outward, using cedar wood as the primary material for the structure.
Cedar is a popular choice for these gardens because it’s naturally resistant to rot and pests, making it durable and long-lasting. These gardens can be anything from a simple cedar ladder planter to an elaborate wall of greenery.
Different Types of Cedar Vertical Gardens
There are various types of cedar vertical gardens you can create. Here are a few:
- Cedar Ladder Planter: A tiered structure that resembles a ladder, perfect for small plants and herbs.

- Cedar Wall Garden: A vertical structure that can be attached to a wall, ideal for creating a green wall in your home or garden.
- Cedar Raised Bed Vertical Garden: Combines the benefits of raised beds with vertical gardening techniques, great for larger plants.
Benefits of Cedar for Vertical Gardens
Durability and Longevity
One of the main reasons people choose cedar for their vertical gardens is its durability. Cedar wood can last for years, even in harsh weather conditions. This means you won’t have to worry about replacing your garden structure anytime soon.
Natural Resistance
Cedar is naturally resistant to insects and rot. Unlike other woods that may need chemical treatments, cedar can withstand the elements on its own. This makes it a safer choice for your plants and the environment.
Aesthetic Appeal

Let’s be honest, cedar wood is beautiful. Its rich color and texture can enhance the look of your garden, making it a stunning focal point. Whether you’re using a cedar vertical garden planter or building a cedar wall garden, the aesthetic appeal is undeniable.
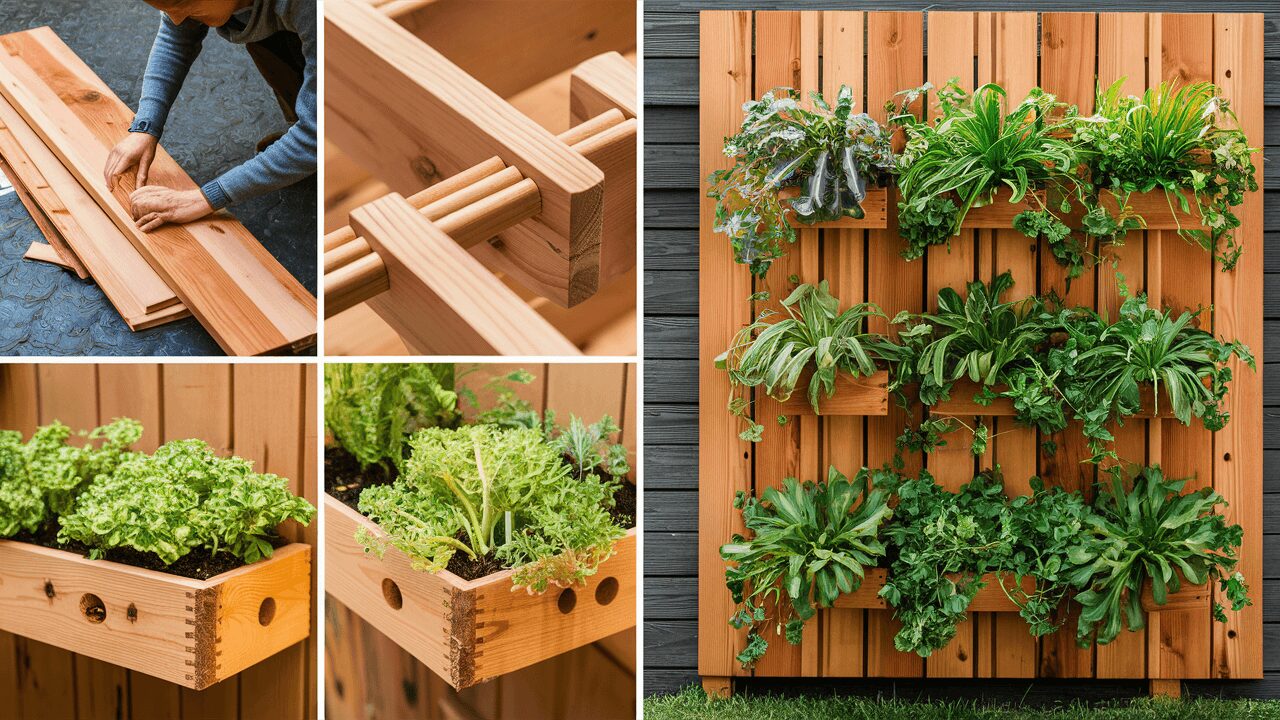
DIY Cedar Vertical Garden: Step by Step Guide
Creating your own cedar vertical garden might sound daunting, but it’s easier than you think. Here’s a simple step-by-step guide to get you started. This guide can be adapted to various configurations depending on the materials you have available.
You can build two-tier, three-tier, and different height versions (24 inches, 36 inches, and 48 inches tall).
Materials Needed
Cedar Wood:
- 5/4x6 cedar planks (or 2x6 if preferred)
- 5/4x4 cedar planks
- Cedar pickets
- Hardware:
- Screws or nails
- Wood glue (optional for added stability)
Tools:
- Drill or hammer
- Saw (hand saw or power saw)
- Measuring tape
- Level
- Sandpaper or a sander
Additional Materials:
- Soil
- Plants or seeds
- Landscape fabric (optional, to line the planter boxes)
Instructions
Step 1: Plan Your Design - decide on the configuration of your cedar vertical garden. Sketch out your design, including the number of tiers and the height (24 inches, 36 inches, or 48 inches tall).
Step 2: Cut the Cedar Planks - measure and cut the cedar planks according to your design. For example, for a three-tier garden, you’ll need planks for the sides, back, and shelves of each tier.
Step 3: Assemble the Structure
- Frame: Start by building the frame of your garden. Attach the side planks to the back plank using screws or nails. Ensure the frame is sturdy and level.
- Shelves: Attach the shelves to the frame. If you’re building a multi-tier garden, start from the bottom and work your way up. Use a level to ensure each shelf is even.
- Pickets: Attach the pickets to the front of each shelf to create a barrier that holds the soil and plants in place.
Step 4: Sand and Finish - use sandpaper or a sander to smooth any rough edges. If desired, you can apply a wood finish or stain to protect the cedar and enhance its appearance.
Step 5: Fill with Soil - line the planter boxes with landscape fabric if using. Fill each shelf or planter box with high-quality soil suitable for your plants.
Step 6: Plant Your Greenery - choose your plants and carefully plant them in the soil. Water them thoroughly to help them settle in.
Want to see this process in action? Watch this amazing step-by-step video tutorial. This video will walk you through each stage of building your cedar vertical garden, sharing expert tips and tricks to make the project even easier.
Don’t miss out on seeing how it’s done – click the video below and start your journey today!
By following these steps, you can create a beautiful and functional cedar vertical garden that fits your space and style. Enjoy the process!
Cedar Vertical Garden Planter
A cedar vertical garden planter is a versatile and stylish way to grow your plants. You can place it on your balcony, patio, or even indoors. Here are some design ideas and tips.
Design Ideas
- Tiered Planter: Create a multi-level planter with shelves at different heights.
- Hanging Planter: Use hooks to hang small planters from a cedar frame.
- Wall-Mounted Planter: Attach planters directly to a cedar panel that can be mounted on a wall.
Tips for Using a Cedar Vertical Garden Planter
- Choose the Right Plants: Small herbs, succulents, and flowers work well in vertical planters.
- Water Regularly: Vertical planters can dry out quickly, so make sure to water your plants regularly.
- Use Quality Soil: Good soil is essential for healthy plants. Choose a high-quality potting mix.
Cedar Vertical Garden Plans
If you’re not the DIY type, don’t worry! There are plenty of cedar vertical garden plans available online. These plans come with detailed instructions and diagrams to help you build the perfect garden.
Customizing Your Plans
- Adjust Sizes: Modify the dimensions to fit your space.
- Add Personal Touches: Paint or stain the cedar wood to match your style.
- Incorporate Extra Features: Add features like a built-in watering system or decorative elements.
Why Cedar is the Best Choice
When it comes to vertical gardening, not all woods are created equal. Cedar stands out for several reasons:
- Durability: Cedar wood can withstand the elements, making it perfect for outdoor gardens.
- Natural Resistance: Cedar’s natural oils repel insects and prevent rot.
- Lightweight: Despite its strength, cedar is relatively lightweight, making it easier to work with.
Comparing Cedar with Other Woods
Let’s compare cedar with some other common types of wood used in gardening:
- Pine: Pine is cheaper but less durable. It needs to be treated to resist rot and pests.
- Redwood: Redwood is also durable and resistant to pests, but it’s more expensive than cedar.
- Teak: Teak is highly durable and beautiful, but it’s very expensive and heavy.
How Long Will a Cedar Raised Garden Last?
A cedar raised garden can last anywhere from 10 to 20 years, depending on the conditions and how well it’s maintained. Here are some tips to extend the life of your cedar garden:
- Keep It Dry: Avoid letting water sit on the wood for long periods.
- Regular Maintenance: Check for signs of wear and tear and repair any damage promptly.
- Protect from Extreme Weather: If possible, move your garden to a sheltered spot during extreme weather.
Maintenance Tips for Cedar Gardens
- Stain or Seal the Wood: Applying a stain or sealant can protect the wood from moisture and UV damage.
- Clean Regularly: Remove any dirt or debris from the wood to prevent mold and mildew.
- Inspect Annually: Check the structure of your garden annually and make any necessary repairs.
Combining Raised Beds with Vertical Gardening
A cedar raised bed vertical garden combines the benefits of raised beds with the space-saving design of vertical gardens. This setup is perfect for growing a variety of plants, from vegetables to flowers.
Building a Cedar Raised Bed Vertical Garden
- Build the Raised Bed: Construct a traditional raised bed using cedar planks.
- Add Vertical Elements: Attach vertical supports to the raised bed and add planter boxes or shelves.
- Fill with Soil and Plant: Fill the raised bed and planters with soil, then add your plants.
Best Practices for Cedar Raised Bed Vertical Gardens
- Use Quality Soil: Good soil is key to a successful garden.
- Choose the Right Plants: Select plants that are suitable for both raised beds and vertical gardening.
- Water Efficiently: Install a drip irrigation system to ensure your plants get the right amount of water.
Plants That Thrive in Cedar Vertical Gardens
Not all plants are suitable for vertical gardens. Here are some that do particularly well:
- Herbs: Basil, parsley, mint, and thyme are perfect for vertical gardens.
- Flowers: Petunias, marigolds, and pansies add a splash of color.
- Vegetables: Tomatoes, cucumbers, and peppers can thrive in vertical gardens.
- Succulents: These low-maintenance plants are ideal for vertical gardening.
Pairing Plants with Cedar Planters
When choosing plants for your cedar vertical garden planter, consider their size, light requirements, and water needs. Mixing and matching different types of plants can create a beautiful and diverse garden.
Building a Cedar Ladder Planter
A cedar ladder planter is a fun and functional project that can add a unique touch to your garden. Here’s how to build one:
Materials Needed:
- Cedar planks
- Screws or nails
- Drill or hammer
- Measuring tape
Instructions:
- Cut the Cedar Planks: Measure and cut the planks to create the steps and sides of the ladder.
- Assemble the Ladder: Attach the steps to the sides using screws or nails.
- Add Planter Boxes: Secure planter boxes to each step of the ladder.
- Fill with Soil and Plants: Fill the planter boxes with soil and add your plants.
Benefits of a Ladder Planter for Small Spaces
A cedar ladder planter is perfect for small spaces because it takes up very little floor space while providing plenty of room for plants. It’s also portable, so you can move it around to catch the best sunlight.
Cedar Garden Ideas
Cedar is a versatile material that can be used in many creative ways in your garden. Here are some ideas:
- Cedar Trellis: Build a trellis for climbing plants like beans or roses.
- Cedar Garden Bench: Add a rustic bench to your garden for a cozy seating area.
- Cedar Compost Bin: Create a stylish and functional compost bin to recycle your garden waste.
Inspirational Examples
- Cedar Pergola: A cedar pergola can provide shade and a beautiful focal point in your garden.
- Cedar Garden Pathway: Use cedar planks to create a charming pathway through your garden.
- Cedar Garden Arches: Add arches made of cedar to create a whimsical entrance to your garden.
Final Thoughts
Cedar vertical gardens are a fantastic way to bring greenery into small spaces while adding a touch of natural beauty. Whether you’re building a cedar ladder planter or a full-fledged cedar wall garden, the possibilities are endless. With its durability, natural resistance, and aesthetic appeal, cedar is the perfect choice for your vertical gardening needs.
So, what are you waiting for? Grab some cedar planks, get your hands dirty, and start creating your own vertical garden paradise today!
Happy gardening!
For more tips and inspiration on vertical gardening, check out Garden Design and Better Homes & Gardens.